Categories
Velbus

Installing OpenHAB – Velbus binding

Log in to openhabian with ssh i.e.:

ssh openhabian@openhabian

Install snap:

sudo apt install snapd

Install velbus-tcp:

sudo snap install velbus-tcp

Get the script from mdar.co.uk page:

wget https://mdar.co.uk/dl/velserv-setup.sh

Make it executable:

sudo chmod a+x velserv-setup.sh

WARNING! The script doesn’t perform any checks) it’s work in progress) – read the script before executing. The script setups and runs velserv

Execute the script with:

sudo ./velserv-setup.sh

Add Velbus Bridge in openHAB bindngs

Set the Velbus bridge using server: localhost and port 6000. Wait a while – it will be off line for a few seconds. That’s how it looks:

Open VelbusLink

Select connect to network

Use your server Ip or hostname, port 6000

IMPORTANT: untick the TLS box!!

Troubleshooting:

From server terminal: “systemctl status velserv” shows the status. If the velserv restarts every few seconds – it might be caused by invalid USB gateway name.

Make sure the gateway is connected:

openhabian@openhabian:~ $ lsusb -d 10cf:
Bus 001 Device 003: ID 10cf:0b1b Velleman Components, Inc. VMB1USB Velbus USB interface


openhabian@openhabian:~ $ udevadm info -q property /dev/bus/usb/001/003 | grep DEVPATH
DEVPATH=/devices/platform/scb/fd500000.pcie/pci0000:00/0000:00:00.0/0000:01:00.0/usb1/1-1/1-1.3

That path should be the same as reported by “stemctl status velserv”. If it’s different it needs to be changed in “/etc/systemd/system/velserv.service”

Categories
Velbus

OpenHAB and Velbus gateway

Progress log:

  1. Installed power supply for OpenHAB server based on raspberry pi
  2. Installed Velbus power supply
  3. Installed raspberry pi, 4B with 4GB RAM
  4. Installed Velbus gateway

All cables need to be upgraded, but the initial setup works. Not all cables are shown – USB between RPI and Velbus gateway is missing.

Categories
Velbus

Velbus .. the beginning

I’ll be documenting here my Velbus journey. If you haven’t heard that name before – Velbus is the only one really open hardware home control platform. A “competition” to Velbus – KNX is an open standard, but there is no way of installing it and using without using proprietary ETS (Windows only) with an encrypted database. Velbus ticked all the open source software/hardware boxes. The configuration software VelbusLink doesn’t run natively on linux, but can be run under WINE/Lutris. The Velbus forum is fantastic source of information. There is a good set of modules – from lighting switches, through control panels (switch with display) and gateways to relays, dimmers, meters, occupancy sensors to a weather station. My plan is to retrofit an old house and use Velbus to control whatever possible – lights, window blinds, heating, air-conditioning, pool automation, energy generation, etc. The OpenHAB will be used for tasks that can’t be directly managed from Velbus. A great source of information about how to install Velbus is MDAR webpage: https://mdar.co.uk

Progress log:

  1. Bought and tested Velbus starter kit.
  2. Bought Finder 3 phase energy meter with pulse output and Velbus I/O module – it will be used to measure home energy production/consumption.
  3. Velbus cable from main fusebox to the external gate installed
  4. Velbus cable in bedroom installed.
  5. Velbus cable and CAT6 cable installed between the living room and the attic.

Categories
Uncategorized

Printing check pattern from command line on Epson printers

$ lpstat -v
device for Epson_Stylus_Photo_R2000: lpd://192.168.1.214:515/PASSTHRU
$ escputil -P Epson_Stylus_Photo_R2000 -n
Escputil version 5.3.3, Copyright (C) 2000-2006 Robert Krawitz
Escputil comes with ABSOLUTELY NO WARRANTY; for details type 'escputil -l'
This is free software, and you are welcome to redistribute it
under certain conditions; type 'escputil -l' for details.
Running nozzle check, please ensure paper is in the printer.
Categories
Uncategorized

Migration to wordpress finished

Not everything is ready, there are some broken links etc, but the main part of the blog has been moved.

Categories
Uncategorized

OpenCyclingComputer update

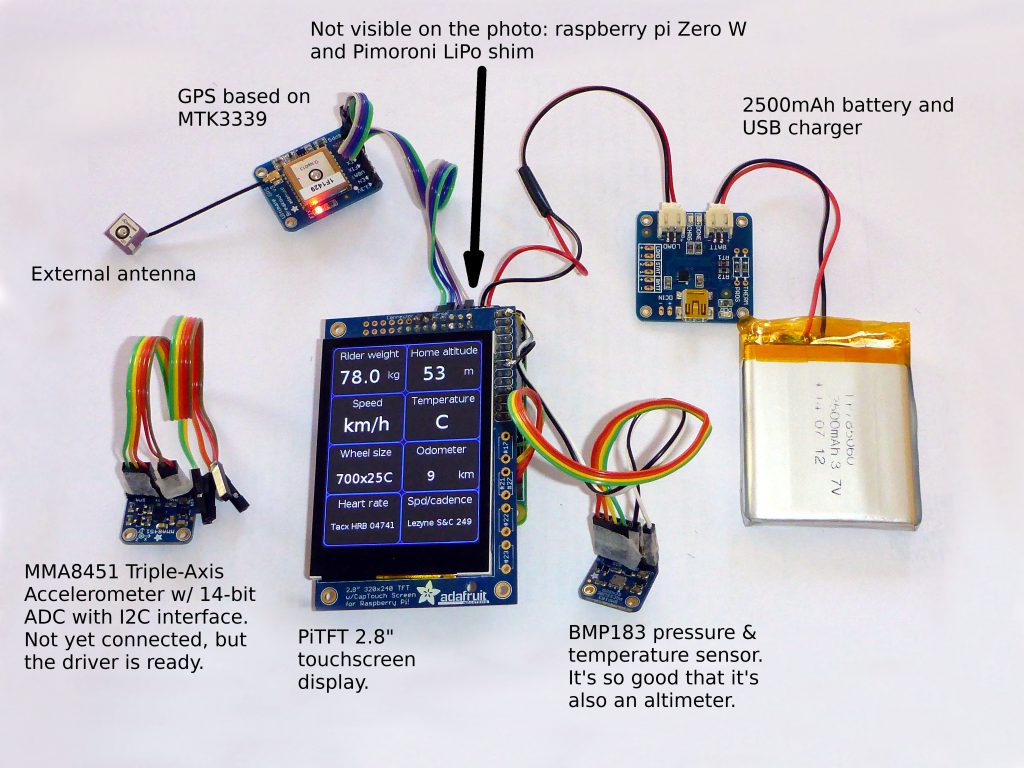
OpenCyclingComputer is finally reaching the “road ready” stage:

occ.jpg
OpenCyclingComputer, Sep 2018

What works:

  • BLE connection with heart rate sensor. Also automatic re-connection and graceful quiet handling of all errors from bluez stack.
  • BLE connection with speed and cadence sensor. It’s really wheel revolution and cadence sensor, but given wheel size it works as speed sensor.
  • Pressure sensor. Iit will be used as an altimeter in the near future. Coded with Kalman filter
  • Temperature sensor
  • GPS module – I still need to do some debugging here, but the drivers were tested on raspberry A+ and worked great.
  • YAML layouts. It’s very easy to change the default layout – it’s simply a text file + some background images.
  • Saving / reading config file. Also YAML,  so it’s a human editable.
  • “Animated” heart rate and cadence icons showing that the related sensors are “alive” and keep sending notifications.
  • All settings can be edited from the OCC screen

Things that need polishing:

  • Calculating averages (speed, heart rate, etc)
  • Implementing Kalman filters where suitable
  • BLE scanning and selecting devices from the OCC screen
  • Calculating altitude and all related parameters like slope, pressure at sea level and others
  • BLE status icon works, but it doesn’t show exactly what’s happening with the connection
  • Implementing Low Battery warning/shut down (hardware is ready)
  • Improving ride log. Currently the format of the log is hard coded

Code develpoment:

  • defining sensor API for future extensions
  • plugging accelerometer into the current system
  • implementing inertion+gps navigation with multi input Kalman filter
  • code cleaning and refactoring
Categories
Uncategorized

Very simple way of accessing PiTFT 240×320 display from python with cairo

I used to use pygame, but outdated SDL problems resulting in malfunctioning touchscreen forced me to use a different solution. Touchscreen works with python-evdev and I needed graphics. Cairo is the obvious choice for 2D and after a few days of playing with different solutions I came up with this:

#Very simple way of accessing PiTFT 240x320 display from python with cairo

import mmap
import cairo

# 320 * 240 * 2 bytes per pixel = 153600
PiTFT_mem_size = 153600

# Framebuffer file, might be /dev/fb0
fb_fd  = open("/dev/fb1", "r+")

#Map the framebuffer to memory
fb_map = mmap.mmap(fb_fd.fileno(), PiTFT_mem_size)

#Create cairo surface. If you get "Function not implemented" error, you need a newer cairo
surface = cairo.ImageSurface.create_for_data(fb_map, cairo.FORMAT_RGB16_565, 240, 320)

#Create cairo context
cr = cairo.Context(surface)

# Paint the surface black
cr.set_source_rgba (0.0, 0.0, 0.0, 1.);
cr.paint_with_alpha (1.0);

for i in range(0, 10):
    c = i / 10.0
    cr.set_source_rgb (1.0 - c, 1.0 - c, 1.0)
    cr.rectangle(15 * i + 10, 15 * i + 20, 100, 100)
    cr.fill ()

#Close the mapped framebuffer
fb_map.close()

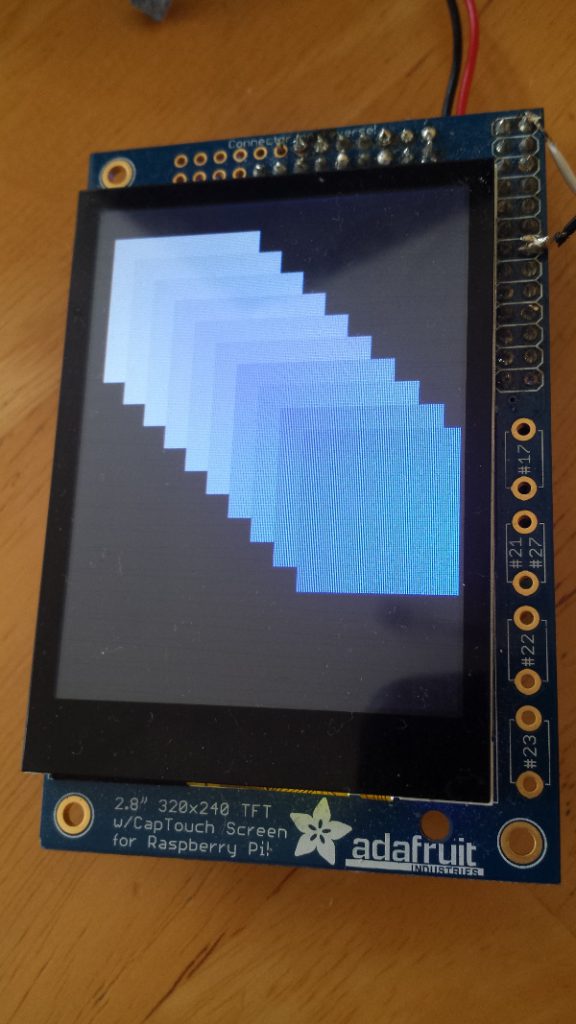
That’s how it looks on the piTFT:

piTFT_and_cairo.jpg
piTFT and cairo graphics, Jul 2018
Categories
Uncategorized

Open Cycling Computer will be Pi Zero W based

Pi Zero W is the new brain of the Open Cycling Computer. PiTFT 2.8″ capacitive dosn’t work out-of-the-box, but required modification are very simple.

Modifications required in /boot/config.txt

1. Uncomment dtparam=spi=on

2. Add dtoverlay=pitft28-capacitive,rotate=90,speed=32000000,fps=20

Modifications required in /boot/cmdline.txt

1. Add after rootwait (the end of line) fbcon=map:10 fbcon=font:VGA8x8 logo.nologo

That’s it! No other modifications are required.

P.S. 31-Mar-2017: Do not install adafruit kernel as it doesn’t support bluetooth/wifi on Pi Zero W yet.

Categories
Uncategorized

Lezyna Speed & Cadence sensor: Lezyne S&C 249 and btle.py

$ ./btle.py fd:df:0e:4e:76:cf random
Connecting to: fd:df:0e:4e:76:cf, address type: random
Service <uuid=Generic Access handleStart=1 handleEnd=7> :
    Characteristic <Device Name>, hnd=0x2, supports READ WRITE 
    -> 'Lezyne S&C 249'
    Characteristic <Appearance>, hnd=0x4, supports READ 
    -> '\x85\x04'
    Characteristic <Peripheral Preferred Connection Parameters>, hnd=0x6, supports READ 
    -> '\x80\x02H\x03\x00\x00\x90\x01'
Service <uuid=Cycling Speed and Cadence handleStart=12 handleEnd=22> :
    Characteristic <CSC Measurement>, hnd=0xd, supports NOTIFY 
    Characteristic <CSC Feature>, hnd=0x10, supports READ 
    -> '\x07\x00'
    Characteristic <Sensor Location>, hnd=0x12, supports READ 
    -> '\x04'
    Characteristic <SC Control Point>, hnd=0x14, supports INDICATE WRITE 
Service <uuid=Generic Attribute handleStart=8 handleEnd=11> :
    Characteristic <Service Changed>, hnd=0x9, supports INDICATE 
Service <uuid=00001530-1212-efde-1523-785feabcd123 handleStart=30 handleEnd=65535> :
    Characteristic <00001532-1212-efde-1523-785feabcd123>, hnd=0x1f, supports WRITE NO RESPONSE 
    Characteristic <00001531-1212-efde-1523-785feabcd123>, hnd=0x21, supports NOTIFY WRITE 
    Characteristic <00001534-1212-efde-1523-785feabcd123>, hnd=0x24, supports READ 
    -> '\x01\x00'
Service <uuid=Battery Service handleStart=23 handleEnd=26> :
    Characteristic <Battery Level>, hnd=0x18, supports NOTIFY READ 
    -> 'd'
Service <uuid=Device Information handleStart=27 handleEnd=29> :
    Characteristic <Manufacturer Name String>, hnd=0x1c, supports READ 
    -> 'Lezyne'
Categories
Uncategorized

Nautilus: batch thumbnail generation for remote location

I have a fairly large photo collection on a raspberry pi based NAS. Unfortunately RPI ethernet port is not fast enough (100MB/s) for comfortable remote operation, so to be able to use that collection I have to keep local thumbnail directory on my linux box. Gnome nautilus is my tool of choice, but nautilus generates thumbnails only after entering a directory. To make that setup workable I had to:

1. Make sure gnome allows big thumbnails and doesn’t expire them: dconf-editor, go to org->gnome->desktop->thumbnail-cache and set maximum-age and maximum-size to -1

2. Generate the thumbnails

Nautilus thumbnails are saved in png files with name like this: 00067ecff5de0e48602327bc987f6d9a.png. The name is md5sum of image path with spaces replaced by %20.  The path is not an absolute path in the system! So for example I have a photo at /run/user/1000/gvfs/sftp:host=192.168.1.231,user=pi/mnt/PhotoArchive/Dump/a_photo.jpg, but the path nautilus uses to generate thumbnail name is sftp://pi@192.168.1.231/mnt/PhotoArchive/Dump/a_photo.jpg (it can be checked in nautilus – just right click on an image and check location). Local files have prefix file://

I had some problems with getting reliable results for a find command run on a remote system, so I decided to create 2 scripts to generate the thumbnails. The first script scans (scan.sh – BROKEN LINK) remote location for images, generates md5sum for the image path and, if there is no thumbnail stored locally, writes the file path to a pipe. Another script (thumbnail.sh –BROKEN LINK) waits for whatever shows up in the pipe and generates the thumbnail. An example usage:

./scan.sh /run/user/1000/gvfs/sftp:host=192.168.1.231,user=pi mnt/ sftp://pi@192.168.1.231

and in a separate terminal:

./thumbnail.sh /run/user/1000/gvfs/sftp\:host\=192.168.1.231\,user\=pi/ sftp://pi@192.168.1.231

Legend:

/run/user/1000/gvfs/sftp\:host\=192.168.1.231\,user\=pi/ <– I have my NAS mounted at that point ($ROOT_DIRECTORY)

mnt/ <–the scripts scan should scan that directory and all subdirectories ($IMAGE_DIRECTORY)

sftp://pi@192.168.1.231 <– path prefix used by nautilius for that location to generate md5sum ($PREFIX)

I used those 2 script to generate over 65.000 (6 GB) of thumbnails. The directory where thumbnails are saved is hardcoded in thumbnail.sh (THUMBNAIL_DIR=/home/przemo/.cache/thumbnails/large/) – please update before using the script!