

It’s a short guide to practical side of bluetooth LE using gatttool. How to read characteristics, turn on notifications and where to find more info about all those BLE numbers.
I was struggling for a while to read data from a BLE heart rate strap. It was working flawlessly with android apps, but I needed it to use it with raspberry pi and python. So, I had to dig a bit deeper under the surface of BLE. The results are below.
Prerequisites:
1. A computer with bluetooth v4.0 card or dongle
2. gatttool (part of bluez). Fedora users might have to compile bluez as there is no gatttool in bluez-5.23-1.fc21 bugreport: [1].
3. A BLE (bluetooth Low Energy, Bluetooth Smart) device – I use a Tacx heart rate belt [2]
An example command line session (red – important or info for later use, blue – value from previous steps, green – comment):
$ hciconfig
hci0:    Type: BR/EDR  Bus: USB
^^ hci0: that's our hci device
    BD Address: C4:85:08:06:9F:C7  ACL MTU: 310:10  SCO MTU: 64:8
    UP RUNNING PSCAN
    RX bytes:10243057 acl:34567 sco:0 events:5307 errors:0
    TX bytes:46612 acl:737 sco:0 commands:2685 errors:0

fedora-lan:/home/przemo
$ sudo hciconfig hci0 up
fedora-lan:/home/przemo
$ sudo hcitool -i hci0 lescan
LE Scan ...   <-- LE Scan was not showing anything, so Ctrl-C and hci0 reset
^Cfedora-lan:/home/przemo
$ sudo hciconfig hci0 reset
fedora-lan:/home/przemo
$ sudo hcitool -i hci0 lescan
LE Scan ...
D6:90:A8:08:F0:E4 Tacx HRB 04741
^^ D6:90:A8:08:F0:E4 that's BLE device address
D6:90:A8:08:F0:E4 (unknown)
D6:90:A8:08:F0:E4 Tacx HRB 04741
D6:90:A8:08:F0:E4 (unknown)

^Cfedora-lan:/home/przemo
$ sudo gatttool -i hci0 -b D6:90:A8:08:F0:E4 -t random -I
^^ if you can't connect try to use "-t random"
[D6:90:A8:08:F0:E4][LE]> connect
Attempting to connect to D6:90:A8:08:F0:E4
Connection successful

Reading value of battery level characteristic
[D6:90:A8:08:F0:E4][LE]> primary
attr handle: 0x0001, end grp handle: 0x0007 uuid: 00001800-0000-1000-8000-00805f9b34fb
attr handle: 0x0008, end grp handle: 0x000b uuid: 00001801-0000-1000-8000-00805f9b34fb
attr handle: 0x000c, end grp handle: 0x0011 uuid: 0000180d-0000-1000-8000-00805f9b34fb
attr handle: 0x0012, end grp handle: 0x0015 uuid: 0000180f-0000-1000-8000-00805f9b34fb
^^^ 180f is "Battery Service", see link [3]
attr handle: 0x0016, end grp handle: 0xffff uuid: 0000180a-0000-1000-8000-00805f9b34fb
[D6:90:A8:08:F0:E4][LE]> characteristics 0x0012 0x0015
handle: 0x0013, char properties: 0x12, char value handle: 0x0014, uuid: 00002a19-0000-1000-8000-00805f9b34fb
^^ 2a19 is Battery Level, links [4] and [5]
char properties 0x12: supports NOTIFICATION 0x10 and READ 0x02 (0x10 | 0x02 = 0x12)

[D6:90:A8:08:F0:E4][LE]> char-read-hnd 0x0014
^^ Reading handle value
Characteristic value/descriptor: 64
^^ value of battery level is 64, but it's hex, so 0x64 = 100. It's in %, link [4]
Reading heart rate
[D6:90:A8:08:F0:E4][LE]> primary
attr handle: 0x0001, end grp handle: 0x0007 uuid: 00001800-0000-1000-8000-00805f9b34fb
attr handle: 0x0008, end grp handle: 0x000b uuid: 00001801-0000-1000-8000-00805f9b34fb
attr handle: 0x000c, end grp handle: 0x0011 uuid: 0000180d-0000-1000-8000-00805f9b34fb
^^ 180d is "Heart Rate" service, link [3]
attr handle: 0x0012, end grp handle: 0x0015 uuid: 0000180f-0000-1000-8000-00805f9b34fb
attr handle: 0x0016, end grp handle: 0xffff uuid: 0000180a-0000-1000-8000-00805f9b34fb
[D6:90:A8:08:F0:E4][LE]> characteristics 0x000c 0x0011
handle: 0x000d, char properties: 0x10, char value handle: 0x000e, uuid: 00002a37-0000-1000-8000-00805f9b34fb
^^ 2a37 is Heart Rate characteristic, links [5] and [6]
char properties: 0x10: supports NOTIFICATION
handle: 0x0010, char properties: 0x02, char value handle: 0x0011, uuid: 00002a38-0000-1000-8000-00805f9b34fb
^^ 2a38 is Body Sensor Location, links [6] and [7]
char properties: 0x02: supports READ
[D6:90:A8:08:F0:E4][LE]> char-read-hnd 0x0011
^^ Reading Body Sensor Location
Characteristic value/descriptor: 01
^^ 0x01 it's "Chest", see link [7] for more options
We need more info to switch on NOTIFICATION of heart rate
[D6:90:A8:08:F0:E4][LE]> char-desc 0x000d 0x000f
^^ range of handles for heart rate: 0x000d is start of the range obtained with 'characteristics 0x000c 0x0011'
0x0010 is start of next characteristic minus 1: 0x0010 - 0x1 = 0x000f
handle: 0x000d, uuid: 00002803-0000-1000-8000-00805f9b34fb
handle: 0x000e, uuid: 00002a37-0000-1000-8000-00805f9b34fb
handle: 0x000f, uuid: 00002902-0000-1000-8000-00805f9b34fb
^^ 2902 it is Client Characteristic Configuration, link [8]
[D6:90:A8:08:F0:E4][LE]> char-write-cmd 0x000f 01
^^ 01 comes from link [8], NOTIFICATIONS enabled
Notification handle = 0x000e value: 00 3e        <-- heart rate, 0x003e is 63 BPM
Notification handle = 0x000e value: 00 3d        <-- heart rate, 0x003d is 62 BPM
Notification handle = 0x000e value: 00 3d        <-- heart rate, 0x003d is 62 BPM
Notification handle = 0x000e value: 00 3c        <-- heart rate, 0x003c is 61 BPM
[D6:90:A8:08:F0:E4][LE]> char-write-cmd 0x000f 00
^^ 00 comes from link [8], NOTIFICATIONS disabled
[D6:90:A8:08:F0:E4][LE]> disconnect              <-- end of connection
[D6:90:A8:08:F0:E4][LE]>
fedora-lan:/home/przemo/android
[1] https://bugzilla.redhat.com/show_bug.cgi?id=1141909
[2] http://www.tacx.com/en/products/sensors/heart-rate-belt
[3] https://developer.bluetooth.org/gatt/services/Pages/ServicesHome.aspx
[5] https://developer.bluetooth.org/gatt/characteristics/Pages/CharacteristicsHome.aspx
MMA88451 doesn’t work with raspbterry pi out of the box. It needs I2C with repeated start. Test program in python:
import smbus
DEVICE_ADDRESS = 0x1d
MMA8451_REG_WHOAMI = 0x0D
bus = smbus.SMBus(1)
ret = bus.read_byte_data(DEVICE_ADDRESS, MMA8451_REG_WHOAMI)
print ret
Shows zero instead of expected 26 (0x1A in hex)
pi@occberry ~/OpenCyclingComputer $ sudo python src/mma8451.py
0
Solution that I found here solves the problem:
sudo chmod 666 /sys/module/i2c_bcm2708/parameters/combined
sudo echo -n 1 > /sys/module/i2c_bcm2708/parameters/combined

and now the python test code shows, as expected:
pi@occberry ~/OpenCyclingComputer $ sudo python src/mma8451.py
26[1] www.adafruit.com/products/2019
[2] www.raspberrypi.org/forums/viewtopic.php?f=44&t=15840&start=25
https://gitlab.com/PrzemoF/mtk3339
Python library for Raspberry PI for Ultimate GPS based on MTK3339 with serial interface as sold by Adafruit. The library helps to set different chip parameters in a sane way. Currently supports minimum functional set of commands:
CMD_HOT_START – hot_start()
CMD_WARM_START – warm_start()
CMD_COLD_START – cold_start()
CMD_FULL_COLD_START – cold_reset()
SET_NMEA_UPDATERATE – set_nmea_update_rate()
SET_NMEA_BAUDRATE – set_baudrate()
API_SET_FIX_CTL – set_fix_update_rate()
API_SET_NMEA_OUTPUT – set_nmea_output()
SET_NAV_SPEED_TRESHOLD – set_nav_speed_threshold()
All functions are preforming basic range check to make sure values are accepted by MTK3339 as there is no check if a call was successful or not.
Example usage:
import mkt3339
gps = mt3339(“/dev/ttyAMA0”)
gps.set_fix_update_rate(800)
gps.set_nmea_update_rate(800)
gps.set_baudrate(115200)
gps.set_nmea_update_rate(1000)
gps.set_nav_speed_threshold(1.5)
gps.set_nmea_output(gll = 0, rmc = 1, vtg = 0, gga = 5, gsa = 5, gsv = 5)
That library is part of Open Cycling Computer project
I was testing that [1] gps chip for a last few weeks – it was great, but it was preforming “cold start” every time it was turned on. Today I finally soldiered the battery holder and slided a CR1220 battery in. If you’re using the same board without the battery get one immediately. Time to fix is now a few seconds (used to be up to 15 minutes) and it gets the fix fairly quickly indoor as well!!
I’m planning to use that board in the Open Cycling Computer project. More to come.
PiTFT capacitive doesn’t require calibration according to Adafruit, but for some reason I couldn’t make it work properly with vertical layout and the default values suggested here [1].
The default values are:
320 65536 0 -65536 0 15728640 65536
I needed to use the screen with Adafruit logo at the bottom [fbtft_device.rotate=90] and with the default /etc/pointercal values I had x axis swapped with y axis.
Explanation how the pointercal values works is here [2]. Some matrix math:

where:
x,y – the touchscreen coordinates returned by the kernel driver
a,b,c,d,e,f,s – pointercal values
u,v – the screen coordinates
The above equation converts to:
u = (x*a + y*b +1*c)/s
v = (x*d + y*e +1*f)/s For the default values:
a = 320, b = 65536, c = 0 d = -65536, e = 0, f = 15728640, s = 65536
u = (x*320 + y*65536 + 0) / 65536
v = (x*(-65536) + y*0 + 15728640) / 65536
I wanted to flip x<->y, so
u = (x*(-65536) + y*0 + 15728640) / 65536
v = (x*320 + y*65536 + 0) / 65536
and now a = -65536, b = 0, c = 15728640 d = 320, e =65536 , f = 0, s = 65536.
However when I tried to use those values in the pointercal file:
-65536 0 15728640 320 65536 0 65536
I found out that x axis is OK, but y axis is still flipped. To fix it we have to change sign of v and add a shift.
v = -(x*320 + y*65536 + 0) / 65536 +320
v = (x*(-320) + y*(-65536) +0)/65536 + 320
v= (x*(-320) + y*(-65536) +0)/65536 + 320*65536/65536
v= (x*(-320) + y*(-65536) +320*65536)/65536
v= (x*(-320) + y*(-65536) + 20971520)/65536
so d = -320, e = -65536 and f = 20971520
Proper pointercal values for vertical layout [fbtft_device.rotate=90] are:
-65536 0 15728640 -320 -65536 20971520 65536
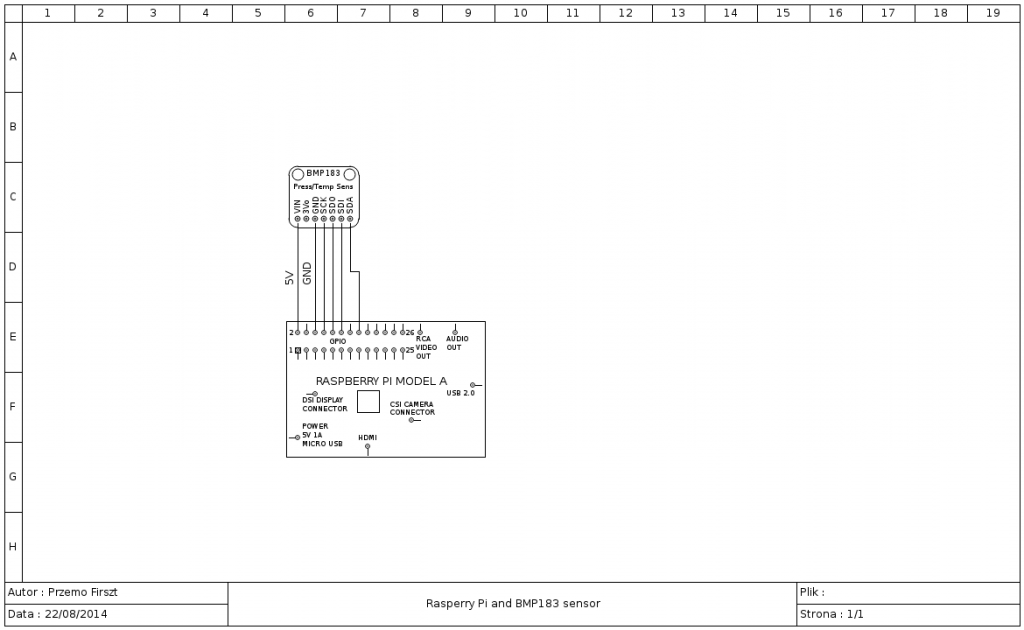
How to measure temperature and pressure with raspberry pi and BMP183
Requirements:
- raspberry Pi
- BMP183 with SPI by Adafruit
- 6 wire female-to-female cable or any other to connect 6 pins between RPI and BMP183
Results:
Temperature: 18.9 deg C Pressure: 1013.39 hPa


That entry is the first part of Open Cycling Computer project
Hopefully soon gnome users will be able to fully utilise OLED displays on wacom Intuos4 wireless tables. More (technical) details here: https://bugzilla.gnome.org/show_bug.cgi?id=724955
Now there is a way of setting OLED icons on Wacom Intuos4 tablets using simple GUI:
The source code can be downloaded from GitLab.
It requires gnome & dconf, but it doesn’t require root access rights as it works by writing to dconf. I hope that some of the ideas tested in i4oled-gui will be used in gnome.
Installing on Fedora 20:
1. Install required packages: sudo yum install git autoconf automake gcc gtk3-devel dconf-devel
2. Clone the repository
git clone https://github.com/PrzemoF/i4oled-gui.git
3. Enter & build
cd i4oled-gui
./autogen.sh
./configure
make
sudo make install
If there is a message about missing gtk+-3.0 during configure stage it means that there is no gtk3-devel package. Same for dconf – it means that there is no dconf-devel package. Ubuntu uses different names: gtk3-dev and dconf-dev.
i4oled-gui looks for icons in 3 locations:
/usr/local/share/i4oled-gui/pixmaps/
/usr/share/i4oled-gui/pixmaps/
~/.icons/wacom/
The first two are shown when “System” button is pressed, The last path is linked with “User” button.
Icons have to be PNG files, 64 x 32, 8-bit/color RGBA, non-interlaced There is a script in data/pixmaps/svg/svg2png.sh that converts SVG to the desired format. Also all icons generated by i4oled can be used. Text entry fields also accepts base64 strings generated by i4oled, but it’s not yet a fully finished feature (stop & start of i4oled-gui is required to see the icon)
Known limitations: i4oled-gui works on first usb tablet found in dconf user file, so if you have more than one tablet .. tough luck (at least until i4oled-gui lands in gnome). There is no bluetooth support yet. Also there is no live preview of rendered text in the icon field.
If you read this entry this far (well done!!) it means that you’re interested in using i4oled-gui, so if you want to send me a feedback use GitLab or przemo (at) firszt (dot) eu
Version 1.2 of OLED handling tool for Wacom Intuos4 Wireless is out! Most important changes are that now i4oled allows to use base64 encoded strings as input or output and it allows multiple outputs at the same time. The base64 strings can be used with gnome dconf-editor to show an icon instead of text. The base64: string should be pasteed into oled-label field instead of normal description. Gnome-settings-daemon will do the rest and convert it back into nice icon on the tablet. The version 1.2 can be downloaded here.